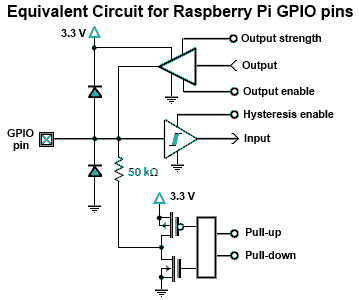
- Digital Input
- The Pi GPIO pins can be set to either output or input. So
far we have seen output which we used to turn a led on and
off.
- For input we need to set the desired pin to be an input and
set a pull up resistor on. The purpose of the pull up
resistor is to ensure that the input is not floating. If
it were left floating then random environmental electrical
noise could cause the input to go from 0 to 1, like,
randomly.
This is not desirable.
We could wire our switch circuit with a 50K Ohm resistor as
seen on the right above. With the Pi, we can just turn
on the internal pull up resistor, diagram to the right. https://en.wikipedia.org/wiki/Pull-up_resistor

- It is also be a good idea to put a 1K Ohm resistor between
the switch and the ground in case we accidentally set the pin
to output rather than input. This will limit the output
current in case the pin is set to output and the switch
closed.
- The switch supplied is a double pole single throw (DPST)
switch. https://en.wikipedia.org/wiki/Switch
This means that it has two sets of contacts that close at the
same time.
We are only interested in one set and will ignore the other
set. Plug the switch in as shown in the image at the
below This connects the pins from row 27 to row 29
when the switch is pushed.

- Once the switch is on the board, wire it up using the jumpers
and a resistor from your kit. Row 29 to the 1K Ohm
resistor then to ground and row 16 to GPIO pin 6. We are
going to use pin 6 for input.
- You need to debounce the input from a switch with some logic
or delays. As the switch closes there is a period when it
goes from open to closed a few times before it closes
solidly. The easiest way to do this is to delay a few
milliseconds before using a switch value. https://en.wikipedia.org/wiki/Switch#Contact_bounce
A simple Python program that reads a switch
#!
/usr/bin/python
import time
import RPi.GPIO as GPIO
GPIO.setmode(GPIO.BCM)
GPIO.setwarnings(False)
led = 19
btn = 6
# Set up leds as output
GPIO.setup(led, GPIO.OUT)
# Set up Switch as input with pull up resistor.
GPIO.setup(btn,
GPIO.IN, GPIO.PUD_UP)
# Set the last input to
lastInput = 1
# Carry on forever
while True:
input = GPIO.input(btn)
time.sleep(.5)
print input
- When you run this program, you will note that when you push
the button the light goes off and when you release it it goes
back on again. This is not the way we would normally
expect buttons to work, but if you look at the circuit it will
make sense. The pullup resistor holds the Pi input pin
high/true/on/1 until the switch is closed. When the switch
is closed the Pi input is pulled to ground or
low/false/off/0. Of course if this is bothering you then
you can just change the software. Change print input
to print not
input
input = GPIO.input(btn)
time.sleep(.5)
print not input
A simple example of it can all be done with code.
Interesting - note that the print display changed.
- Add control of the led.
time.sleep(.5)
input = GPIO.input(btn)
print not input
GPIO.output(led,
not input)

